![]()
![]()
![]() Column Heading Definitions
Column Heading Definitions ![]() Parameter Definitions and Procedures
Parameter Definitions and Procedures
Use the Miscellaneous Parameters screens to design the format and content of the Interim Report. Miscellaneous Parameters include items that are not specific to patient results or data field locations. The parameters are found on seven successive screens.
The order suggested by Aspyra to set Report Parameters is to start with the header parameters, advance to the footer parameters and then select the body parameters.
After you have set the header, footer, and body parameters for the report, advance to the Miscellaneous Parameters to complete the report design.
For further information, see Header and Footer Fields and Body Fields.
If you do not define the parameters for the reports, a default set of parameters can be used for the report.
___________________________________________
Caution: ![]()
To leave a screen in the CyberLAB system, always click the Exit button at the upper-right corner of the screen.
Do not use the (red or black) X button at the top-right corner of the screen. This action can affect operation of the application.
____________________________________________
Interim Report Column Headings |
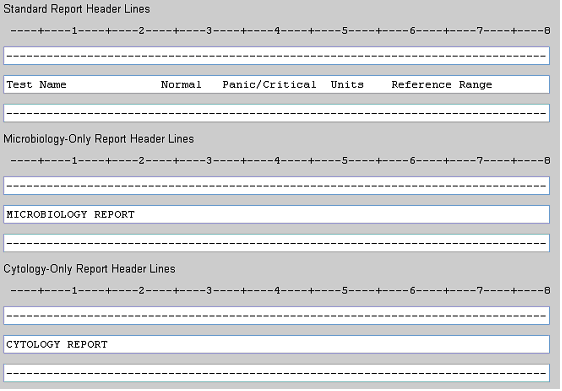
Important for All Headers: Enter and maintain the column headings that you want to appear on the report. The location of the column headings correspond to the data that displays under them.
Note: If spaces are left before the first entry, the entire line justifies to the left when it is saved. An initial character must be used in the first column.
|
Standard Report Header The standard report header is used on all samples, except those that are Microbiology only or Cytology only.
Microbiology or Cytology headers are used when the samples contain only Micro type or Cytology type tests in the sample.
If Micro or Cytology tests are mixed with other test types, the standard report header can be used.
|
Enter the label to designate that the Interim Report is complete. The default entry is the word, Complete.
Enter a maximum of 25 alphanumeric characters.
Enter the label to designate that the Interim Report is preliminary. The default entry are the words, Preliminary Report.
Enter a maximum of 25 alphanumeric characters.
Parameter Definitions and Procedures |
Note: The parameters are listed as they appear on the Miscellaneous Parameters screens for the Interim Report. The miscellaneous parameter list starts with the first screen.
Keyboard Users: To navigate around a screen or scroll within a selection list, use the Tab key to move down and the Tab and Shift keys to move up. Press the Enter key to select the data.
For a shortcut key, also known as a hot key, press the Alt key and the key corresponding to the letter that is underlined, for example, Alt + O for OK.
|
Parameters |
Definitions and Procedures
|
|
Print Patient Additional Information Comment in Report Body |
This generic comment is specific to the demography of a patient.
Click to display the drop-down list. Click to select an option. The options are: Yes. Select the Yes option to include the entered comments on the Interim report. Enter the column number. No. Select the No option if you do not want to print the comments on the Interim report. Do not define a column.
Enter in the Column text box the number of the column that marks the start position of the additional information comment in the report body. |
|
Print Sample Miscellaneous Information Comment in Report Body |
The comment is sample-specific and is located in the Patient Entry submodule.
Click to display the drop-down list. Click to select an option. The options are: Interim and Inquiry - Select this option to print the comment in the report body and in the result area of the Sample ID in the Patient Inquiry submodule. Neither - Select this option to NOT print the sample miscellaneous comment in the report body or in Patient Inquiry. Interim Only - Select this option to print the comment only in the report body. Inquiry Only - Select this option to print the comment only in the result area of the Sample ID in Patient Inquiry.
Enter in the Column text box the number of the column that marks the start position of the sample miscellaneous information comment in the report body. |
|
Print Director's Name in Report Body |
Indicate if the name of the director entered on the Director/Print tab screen in General System Parameters, shall appear in the body of the Interim report.
Click to display the drop-down list. Click to select an option. The options are: Yes. Select the Yes option to print the name in the body of the Interim report. No. Select the No option to NOT print the name of the director in the body of the Interim report. Move down one line prior the last sentence. The name prints instead at the end of the report after the last test result. |
|
Print Sample Comments in Report Body |
Sample comments are sample-specific and are located in the Patient Entry submodule.
Click to display the drop-down list. Click to select an option. The options are: Yes. Select the Yes option to print sample comments in the report body. No. Select the No option to NOT print sample comments in the report body.
Enter in the Column text box the number of the column that marks the start position of the sample comments in the report body. |
|
Last Line of Report Body (1-66) |
Indicates the last line that shall be used to print the body of the Interim Report. The report body refers to the result information section of the report.
To indicate the last line is useful if an odd-length report (other an the standard 11-inch-length paper) or if a footer is needed. The standard form length is 66 lines. The recommended entry is 57 for the last line of the report body.
You can include a footer on the report and have a space between the last test result and the first line of the footer. To achieve this spacing, set the last line to a number two less than the first line of the footer. See Header and Footer Parameters. |
|
Microbiology Sensitivities Comment Code |
When a sensitivity is reported in a micro test result, you can enter or select a three-digit comment code to interpret the result.
Enter the comment code from the Comment selection list in the text box, if you know it.
OR, double-click within the text box to display the Comment selection list. Click to select a desired code.
Note: o The desired comment prints after the last sensitivity of the culture. o If a sensitivity is not found, the comment does not print on the report. o If an organism is identified but a sensitivity is not performed, the comment does not print. o If the text box is left blank, no message prints. |
|
Print Blank Line Between Ordered Tests |
Indicate if you want a blank line to separate ordered tests on the report.
Click to display the drop-down list. Click to select an option. The options are: Yes. Select the Yes option to print a blank line between ordered tests on the report. No. Select the No option to NOT print a blank line between ordered tests on the report. |
|
Continued on Next Page Label |
When you print a multiple page report, you can indicate that the report is continued on the next page. The label appears on each page of the report, except the last page. Enter the desired text in the text box. Enter a maximum of 25 characters.
For placement of the label, see Header/Footer Fields. |
|
End of Report Label |
When you print a multiple page report, you can indicate the last page of the report or a single page report. The label appears on the last page of a multiple page report or at the end of a single page report. Enter the desired text in the text box. Enter a maximum of 25 characters.
For placement of the label, see Header/Footer Fields. |
|
Report Urine Nitrate Result
|
Include or do not include the Urine Nitrate component when you print the urinalysis test results.
Click to display the drop-down list. Click to select an option. The options are: Yes. Select the Yes option to include the Urine Nitrate component. If you performed the nitrate component of urinalysis and want to include it as part of the results when found, select Yes. No. Select the No option to NOT include the Urine Nitrate component if you do not test for nitrate. |
|
Report Urine Leukocyte Result |
Include or do not include the Urine Leukocyte component when you print the urinalysis test result.
Click to display the drop-down list. Click to select an option. The options are: Yes. Select the Yes option to include the Urine Leukocyte component. If you performed the leukocyte component of urinalysis and want to include it as part of the results when found, select Yes. No. Select the No option to NOT include the Urine Leukocyte component if you do not test for leukocyte. |
|
Zip Code Format |
American Format The zip code for the client on the printed report is formatted to automatically include a hyphen between the fifth and sixth digits of the zip code that was entered in the Client Master. For example, XXXXX-XXXX.
Canadian Format There is no hyphen in the Canadian format. For example, the Canadian format has six characters: XXX XXX.
Click to display the drop-down list. Click to select an option. The options are: American or Canadian. |
|
Retain Original Ordering Doctor on Copy-To Reports |
A feature of the CyberLAB system is to enable the Attending doctor and six additional (Copy-To doctors) to receive a copy of the clinical reports for a Sample ID. The six Copy-To doctors are entered in the Patient Entry process. The standard process of a Copy-To report can replace the Admitting (Ordering) doctor with the Copy-To doctor.
Click to display the drop-down list. Click to select an option. The options are: Yes. Select the Yes option to keep the original ordering doctor on the report. The name of the Copy-To doctor does not replace the Ordering doctor but rather is added to the report. No. Select the No option to NOT keep the original Ordering doctor on the report. The name of the Ordering doctor is replaced by the Copy-To doctor. |
|
Suppress Micro Organism Resulted Date/Time |
Do not print the date and time that an organism was identified in the micro test result. The entered results shall print regardless of the options selected.
Click to display the drop-down list. Click to select an option. The options are: Yes. Select the Yes option to NOT print the date and time that an organism was identified in the micro test result. No. Select the No option to print the date and time that an organism was identified in the micro test result. |
|
Suppress Autotransmit Report Summary |
The summary page which prints at the end of the report transmission to the doctor, summarizes the number of reports transmitted in that particular batch.
Click to display the drop-down list. Click to select an option. The options are: Yes. Select the Yes option to suppress the Autotransmit Report summary page at the end of autotransmitted report No. Select the No option to NOT suppress the units and reference range. The summary page prints on an individual page after the last sample in the batch is printed. |
|
Include Century in Dates |
Indicate if you want to include the century in each date that prints on the Interim report.
Click to display the drop-down list. Click to select an option. The options are: Yes. Select the Yes option to include the century in each date on the Interim report. For example, 07/04/2007. No. Select the No option to NOT include the century in each date on the Interim report. For example, 07/04/07. |
|
First Line of Report Body (0-66, 0 = After Header) |
Indicate a specific location at which the report body shall start to print. The report body refers to the result information section of the report.
The default entry is zero, which specifies that the report body immediately follows the report header information. You can designate a number other than zero to place blank lines before the report body. |
|
Flag Abnormal Urinalysis Results with This Character |
If normal ranges are defined for urinalysis tests, this flag appears next to abnormal urinalysis results. The default entry is an asterisk (*). Enter a maximum of one alphanumeric character to select an alternate indicator. |
|
For Preliminary Reports, Only Print Test When First Resulted |
After a test has been resulted and printed on the Interim report, this parameter specifies that the test not be printed again when another test is resulted in the same Sample ID.
Click to display the drop-down list. Click to select an option. The options are: Yes. Select the Yes option to print a test result only once on the Interim report. No. Select the No option to allow all resulted tests to print on the Interim report even if it was printed previously.
Note: When a report on a Sample ID is force-printed via Patient Inquiry, the flags that specify that only first time test results be printed on the preliminary and final reports, are ignored. |
|
Differential Absolute Subheader |
This parameter is applicable only if the CyberLAB system has been configured to calculate the Absolute Differential results within a Manual Differential based on the Percentage Differential and WBC.
If the parameter is applicable, you can print a separate test name above the calculated values of the Absolute Differential on the report. For example, Absolute Differential. Enter a maximum of 25 characters in the text box. |
|
Differential Percentage Subheader |
If you want to print a test name different than the name defined in the Test Dictionary for Manual Differential, enter the desired name in the text box.
The Manual Percentage Differential Results print with the name defined in the Test Dictionary if a subheader is not entered in this text box. Enter a maximum of 25 characters. |
|
Print Clinical Notes at End of Report |
Indicate if the clinical notes are to be printed at the end of the report.
Click to display the drop-down list. Click to select an option. The options are: Yes. Select the Yes option to print the clinical notes at the end of the report. No. Select the No option to NOT to print the clinical notes at the end of the report. If you select No, the clinical notes are not printed in the report.
Enter in the Column text box the number of the column that marks the start position of the additional information comment in the report body. |
|
Clinical Notes Subheader |
Indicate if there shall be a subheader for clinical notes in the report. If so, enter the title of the subheader in the text box. Enter a maximum of 25 characters in the text box. |
|
Print Clinical Notes Date/Time and Tech |
Clinical notes about an ordered test in a sample are entered in Patient Inquiry. New notes can be added to existing comments, but the existing comments cannot be modified or deleted. Indicate if you want to require the laboratory technologist who entered the clinical notes and the date and time of the entry to appear on the report.
Click to display the drop-down list. Click to select an option. The options are: Yes. Select the Yes option to print the technologist and date and time of the entry on the report. No. Select the No option to NOT print the technologist and date and time of the entry on the report. |
|
Print REFERENCE COPY ONLY on Force-Printed Reports |
Force-printed reports are Interim reports that are printed on-demand via the Print tab screen in Patient Inquiry. This parameter indicates if the phrase, REFERENCE COPY ONLY, is printed on force-printed reports.
Click to display the drop-down list. Click to select an option. The options are: Yes. Select the Yes option to print REFERENCE COPY ONLY on force-printed reports. No. Select the No option to NOT print REFERENCE COPY ONLY on force-printed reports. |
|
Suppress Printing Name/Address for These Send Out Codes |
When a test is performed at a send out (reference) lab, the Interim report can automatically include the send out lab name and address as a footnote to the result of the send out test. The name and address are entered in the Send Out Code Maintenance submodule.
If you do not want to include the name and address of a particular send out lab on the Interim report, indicate the code for each send out lab in a text box. A maximum of three send out codes can be entered. Each code is a maximum of one character. |
|
Print Header/Footer Times in 12-Hour Format with AM/PM |
Indicate if you want the report to follow a 12-hour or 24-hour clock. The CyberLAB system operates on a 24-hour clock. Click to display the drop-down list. Click to select an option. The options are:
Yes. Select the Yes option to follow a 12-hour clock and indicate AM and PM after the time. No. Select the No option to use the hour clock on the Interim Report. |
|
For Final (Complete) Reports, Only Print Test If First Time Resulted |
At the time a final report prints, all of the ordered tests are resulted. This option specifies that only those tests that are resulted but not printed previously on the report can appear on the final report.
Click to display the drop-down list. Click to select an option. The options are: Yes. Select the Yes option to only print tests that are resulted but not printed previously on the report. No. Select the No option to print all test that have been ordered and resulted for the Sample ID. |
|
Flag Abnormal Alpha Results with These Characters |
Enter in the text box the alphanumeric characters used to flag abnormal Alpha Results for your facility. Enter a maximum of two characters. |
|
Substitute Standard Abnormal Flags (VL/VH) with |
If you do not want to use the standard panic/critical flags, enter the substitute for VL (Very Low) in the first text box and the substitute for VH (Very High) in the second text box. Enter a maximum of two characters in each text box. |
|
Use Location (Nursing Station,. Room, Bed) from |
If a patient moves during a visit to the medical facility, indicate if the location of the patient shall be: o Sample - sample-specific (location where test order created), or o Demography - demographic-specific (location as stated in the current patient demographic information).
Click within the text box to display the drop-down list. Click to select one of the options: Sample or Demography. |
|
If Sample Location Is Blank, Use Demographic Location |
Use this flag in conjunction with the parameter above. Click to display the drop-down list. Click to select an option. The options are:
Yes. Select the Yes option to specify that you want to use the demography option when one does not exist for the sample. No. Select the No option to specify that the Location text box be blank on the Interim Report. |
|
Print Copy-To Only on |
Refers to the position on the report where the name of the particular Copy-To provider is printed.
Click to display the drop-down list. Click to select an option. The options are: First Page (Header/Footer) - Select this option to print the name of the Copy-To doctor on the header and/or footer of the first page of the report. Last Page (Footer) - Select this option to print the name of the Copy-To provider on the footer on the last page of the report. |
|
Page Break by Department |
Group the ordered tests of the Sample ID by department. Print each department on a separate page of the report.
Click to display the drop-down list. Click to select an option. The options are: Yes. Select the Yes option to group the test by department and print each department on a separate page of the report. No. Select the No option to NOT group tests by department in the report. Tests print in the sequence in which they were ordered. |
|
Department to Use for Department-Specific Options |
The CyberLAB system allows two different department codes to be defined for each test in the Test Dictionary: Test Department and Report Department. -- Test Department specifies the department in which the test is performed. The Test Department information is used as a sort criteria to generate worksheets, Results Certification log, and Pending Work Report. -- Report Department allows you to define a different sort criteria for the Interim, Cumulative, and Micro Cumulative reports.
Click to display the drop-down list. Click to select an option. |
|
Start Column for Console Test Text and Comments |
Text and comments that are part of the test results provided by a console are positioned just below the test results. Console tests are: Manual differentials, urinalysis, and Microbiology tests.
Enter in the text box the number of spaces to indent from the left margin. Enter a maximum of two digits. |
|
Print Microbiology Log In Date and Time |
Print the date and time that the micro culture was logged into the Microbiology module.
Click to display the drop-down list. Click to select an option. The options are: Yes. Select the Yes option to print the date and time that the micro test was logged into the Microbiology module. No. Select the No option to NOT print the date and time that the micro test was logged into the module. |
|
Start Column for Result Text and Comments for Other Than Console Tests |
Text and comments that are part of the test results of nonconsole tests. The text and comments are positioned just below the test results. Enter in the text box the number of spaces to indent from the left margin. Enter a maximum of two digits. |
|
When Result Is Longer Than Six Characters, Print on Next Line |
Print the result on next line if the result is longer than six characters. Yes. Select the Yes option to print the result on the next line. No. Select the No option to print the result on the same line as the test name. |
|
Suppress Manual Differential Totals |
Do not print Manual Differential totals on the Interim report.
Click to display the drop-down list. Click to select an option. The options are: Yes. Select the Yes option to NOT print Manual Differential totals on the report. No. Select the No option to allow Manual Differential total to be printed on the report. |
|
Print Microbiology Final Indicator |
Print the Final Microbiology Indicator.
Click to display the drop-down list. Click to select an option. The options are: Yes. Select the Yes option to print the final result indicator. No. Select the No option to NOT print the final result indicator. |
|
Start Column for Microbiology Preliminary/Final Indicator |
Enter in the text box the position for the Microbiology Preliminary and/or Final indicator. Enter a maximum of two digits. |
|
Print Collection Comments in Report Body |
Collection comments relate specifically to the collection of a specimen from a patient. Collection comments are located in the Patient Entry submodule.
Click to display the drop-down list. Click to select an option. The options are: Yes. Select the Yes option to print collection comments in the report body. Collection comments print after the header and before the test results. No. Select the No option to NOT print collection comments in the report body.
Enter in the Column text box the number of the column that marks the position of the collection comments in the report body. Enter a maximum of two digits. |
|
Start Column for Test Interpretations |
Enter the column number to position the test interpretations in the report. Enter a maximum of two digits. |
|
Print Sample Comment Code in Report Body |
Sample Comment Code refers to the Comment selection list. You can select a predefined comment from the list to explain or describe a sample-specific view in the Patient Entry submodule.
Click to display the drop-down list. Click to select an option. The options are: Yes. Select the Yes option to print the sample-specific comments in the report body before the test results. No. Select the No option to NOT print the sample-specific comments in the report body.
Enter in the Column text box the number of the column that marks the position of the sample predefined comments in the report body. Enter a maximum of two digits. |
|
Suppress Printing for These Departments |
Do not print test results for a maximum of two departments. To suppress printing of test results, enter the two-character code for one department in each text box. |
|
Urinalysis Components Order |
Four urinalysis components are appearance, color, pH and specific gravity (SG). Appearance and color can be defined in terms of order of appearance on the patient report.
Enter the numeric values 1 through 4 to indicate the order in which these four components should print on the patient report. |
|
Adjusted WBC Label |
A calculation made by the CyberLAB system of the WBC results based upon the Differential Results. The Adjusted WBC is provided in addition to the actual WBC results. Enter a maximum of 25 characters in the text box. |
|
Changed Report Label |
Enter in the text box the format in which you want the Changed Report label to appear on the report. Enter a maximum of 50 characters. Leave the text box blank, if you do not have a preference. For example, the label can appear as: ***CHANGED REPORT ***
For placement of the label, see the header/footer sections. |
|
Changed Result Label |
Enter in the text box the format in which you want the Changed Result label to appear on the report. Enter a maximum of 25 characters. Leave the text box blank, if you do not have a preference. For example, the label can appear as: CHANGED, PRIOR RESULT:
For placement of the label, see the Changed Results Fields. |
|
Print Sample ID Call Comments in Report Body at This Column |
Position the Call Comments of the Sample ID at a specific place in the report body. Enter a maximum of two digits in the text box to specify the position of the call comments.
These comments are entered in the Call Report Phone List program. |
|
Called Result Label |
Enter in the text box the format in which you want the Called Result label to appear on the report. Enter a maximum of 25 characters. Leave the text box blank, if you do not have a preference. For example, the label can appear as: CALLED RESULT:
For placement of the label, see the Called Result Fields. |
|
When Result Is Comment, Print First Line of Comment on Test Name Line |
Indicate if you want to print the first line of the comment on the test name line.
Click to display the drop-down list. Click to select an option. The options are: Yes. Select the Yes option to require the first line of a comment be printed on the test name line in the report. No. Select the No option to print the first line of a comment on the next line rather than on the test name line in the report. |
|
Print Sample, Collection, and Comment Code on All Pages |
Refers to information stored in sample and collection comments.
Click to display the drop-down list. Click to select an option. The options are: Yes. Select the Yes option to print the sample-specific comments on all pages of the report body. You must select the Yes option to print the comments. No. Select the No option to NOT print the sample-specific comments in the report body. |
|
Suppress Printing of Differential Counts Subheader |
Do not print the Differential Counts subheader.
Note: This parameter applies to Differential Percentage and Differential Absolute.
Click to display the drop-down list. Click to select an option. The options are: Yes. Select the Yes option to NOT print the Differential counts subheader on the report. No. Select the No option to allow the subheader to print on the report. |
|
Print High Range Flag for High Alpha Test Results |
Indicate if a high range flag shall appear in the report if there is an abnormal Alpha test result.
Click to display the drop-down list. Click to select an option. The options are: Yes. Select the Yes option to print the high range flag in the report. No. Select the No option to NOT print the high range flag in the report. |
|
Print Send Out Footnotes by Department |
When the test results are sorted by department, print the name and address of the send out (reference) lab in the footnotes of the appropriate department.
Click to display the drop-down list. Click to select an option. The options are: Yes. Select the Yes option to print the footnotes in the appropriate department. No. Select the No option to NOT print the footnotes by department. the footnotes print at the end of the report. |
|
Print Two-Digit Page Number Instead of Four-Digit |
Print the page numbers in the report as two digits, not four digits.
Click to display the drop-down list. Click to select an option. The options are: Yes. Select the Yes option to print the page numbers as two digits. No. Select the No option to NOT print the page numbers as two digits. |
|
Number of Sample Comment Lines to Print in Header/Footer |
Enter in the text box, the number of lines to print in the Header/Footer areas. Enter a maximum of 12. |
|
Translation Delimiters |
Use characters to indicate that the label has been translated into another language.
Enter a maximum of four characters in the Translation Delimiters text box.
In the Start Column (Field Size = 12) text box, under the position where the translation delimiters are to be placed. Enter a maximum of two digits. |
|
Special Formatting: Use Any Character in Any Position. X Represents Data |
Use these text boxes if you want to represent the Patient ID and the Sample ID in a different format on the Interim report.
Note: The x used in the special formatting must be lowercase.
For example, if the Patient ID in CyberLAB is 123456789 and you want it to appear on the report as P-123-45-6789, then enter the ID in the text box as: P-xxx-xx-xxxx. Use the same method for a Sample ID.
Enter a maximum of 31 characters for the Patient ID and a maximum of 19 characters for the Sample ID. |
|
For Urinalysis, Print Subheaders for: |
Print subheaders in the Interim report for these two characteristic categories: Chemistry and Microscopic.
Click to display the drop-down list for Chemistry and Microscopic . Click to select an option. The options are: Yes. Select the Yes option to print a subheader for Chemistry. Select the Yes option to print a subheader for Microscopic. No. Select the No option to NOT print a subheader for Chemistry. Select the No option to NOT print a subheader for Microscopic. |
|
Print Microbiology Antibiotics in Sensitivity Pattern Order |
Print the antibiotics in the same order of sensitivity in which they are entered in the sensitivity panel defined in Microbiology Parameters.
Click to display the drop-down list. Click to select an option. The options are: Yes. Select the Yes option to print the micro antibiotics in the order of sensitivity panel. No. Select the No option to print the micro antibiotics in alphabetical order by code. |
|
Print Copy-To Providers on Original Ordering Doctor Report |
Indicate if the list of Copy-To providers shall be printed on the original ordering doctor report.
Click to display the drop-down list. Click to select an option. The options are: Yes. Select the Yes option to print the list of Copy-To providers on the report. No. Select the No option to NOT print the list of Copy-To providers on the report. |
|
Maximum Number of Copy-To Providers to Print, Including Primary Care Doctor |
Enter in the text box the maximum number of Copy-To providers that are to receive the report. Enter a maximum of 7. The seventh doctor is the Primary Care doctor, if used. |
|
Label for Copy-To Providers List |
Enter in the text box the label that you want to use for the Copy-To providers. Enter a maximum of 20 characters.
Enter in the second text box the number of the column where the list of Copy-To providers shall be placed. Enter a maximum of two digits. |
|
Print Only Departments with Completed Tests |
Print only departments that have completed test results. Used when the report is printed by department.
Click to display the drop-down list. Click to select an option. The options are: Yes. Select the Yes option to print only departments that have completed test results. No. Select the No option to NOT limit departments to those that have completed tests results. |
|
Label for Result Tech Information |
Note: The Tech ID information is of the technologist who releases the test results.
Enter in the text box the label for Result Tech Information that you want to appear on the report. Enter a maximum of 20 characters. Leave the text box blank, if you do not have a preference.
Start Column - Enter the number of the column at which the Result Tech Information is to appear on the report. Enter a maximum of two digits. |
|
Start Column for Result Tech ID |
Enter the column number to position the result tech ID in the report. Enter a maximum of two digits.
Note: If the text box is left blank, the Result Tech ID does not print. |
|
Start Column for Result Tech Name |
Enter the column number to position the name of the result tech in the report. Enter a maximum of two digits.
Note: If the text box is left blank, the Result Tech name does not print. |
|
Print Result Tech Information on Line After Result |
Indicate if the Result Tech ID and name are to be appear on the line after the result in the report. Click to display the drop-down list. Click to select an option. The options are:
Yes. Select the Yes option to specify that the result tech information appears on the line after the result in the report. No. Select the No option to print the result tech information on the same line as the result. |
|
Print Blank Line After Result/Console Text and Comments |
Indicate if you want to print a blank line after the result and/or console text and comments.
Console tests are: differentials, urinalysis, and Microbiology cultures.
Click to display the drop-down list. Click to select an option. The options are: Yes. Select the Yes option to print a blank line after result and/or console text and comments. No. Select the No option to NOT print a blank line after result and/or console text and comments. |
|
Print Blank Line Between Panels Even If Within Other Panels |
Indicate if you want a blank line to separate panel tests, even if there are panel tests within panel tests on the report.
Click to display the drop-down list. Click to select an option. The options are: Yes. Select the Yes option to print a blank line between panel tests on the report. No. Select the No option to NOT print a blank line between panel tests on the report. |
|
If Changed Result Fields Are Defined, Print All Changes |
Indicate if changed results on the report are defined to print all changed results rather than the most recent change. Click to display the drop-down list. Click to select an option. The options are: Yes. Select the Yes option to print all changed results on the report, if the changed results are defined. No. Select the No option to print only the most recent result (change) on the report. |
|
Suppress Dosage in Sensitivity Single and Multiple Therapy Formats |
Do not print the dosage comments for an antibiotic that is provided in the Single and Multiple Therapy formats.
Click to display the drop-down list. Click to select an option. The options are: Yes. Select the Yes option to NOT print the dosage comments for the antibiotic that is provided by the Single and Multiple Therapy formats. No. Select the No option to enable the dosage comments of the therapy formats to print on the clinical report. |
|
Start Column for Component Names of Console Test with Changed Results |
Enter the column number to position the component names of a console test in the report. Enter a maximum of two digits. Console tests are: Manual differentials, urinalysis, Microbiology cultures. |
|
Ignore Defined Start Column for Any Text Flagged as Long |
Ignore the designated start column if any text is flagged as long. (For example, if the text is 50 to 75 characters on a line.)
Click to display the drop-down list. Click to select an option. The options are: Yes. Select the Yes option to ignore the designated start column if text long. No. Select the No option to NOT ignore the designated start column. |
|
Print Comment Code in Report Body |
Refers to a predefined comment on the Comment selection list. These comments can be used for other subjects than sample and collection.
Double-click to display the Comment selection list. Double-click to select an option.
Enter in the Column text box the number of the column that marks the position of the predefined comments in the report body. Enter a maximum of two digits.
This comment code can be entered or selected in the Patient Entry and Maintenance submodule. |
|
Location to Print Comment Code |
Refers to the location on the report where the predefined comments selected from the Comment selection list are placed. These comments can be used for other subjects than sample and collection.
Click to display the drop-down list. Click to select an option. The options are: First, After Heading - Select this option to position the predefined comments immediately after the heading of the report. Before First Test - Select this option to position the predefined comments before the first test result on the report.
This comment code is located in the Patient Entry and Maintenance submodule. |
|
Suppress Units and Reference Range When Result Is Comment |
When the test result is a predefined comment from the Comment selection list, suppress units and the reference range.
Click to display the drop-down list. Click to select an option. The options are: Yes. Select the Yes option to suppress the units and reference range. No. Select the No option to NOT suppress the units and reference range. |
|
Print Age When It Is Zero |
Indicate if the age of the patient is to be printed as zero on the report. Click to display the drop-down list. Click to select an option. The options are:
Yes. Select the Yes option to print the age as zero on the report. No. Select the No option to NOT print the age on the report. |
|
Print Microbiology Site |
Print the free text site description for the culture.
Click to display the drop-down list. Click to select an option. The options are: Yes. Select the Yes option to print the Microbiology site description. No. Select the No option to NOT print the Microbiology site description. |
|
Print Microbiology Test Remark |
The term Remark indicates that the predefined comment selected from the Comment selection list applies to the direct smear culture result. Two conditions can affect a Microbiology Test Remark:
Click to display the drop-down list. Click to select an option. The options are: Yes. Select the Yes option to print the contents of the micro remark on the Interim report. No. Select the No option to NOT print the contents of the micro remark on the Interim report. Note: The comment does appear in Patient Inquiry. |
|
Print Morphologies with No Value for Differentials without Normal Ranges |
Manual differentials that are defined without normal ranges print differently (columns) on the Interim report than those defined with normal ranges (single list). For those defined without normal ranges, the default prints all morphology components, even if a component does not have any results.
Click to display the drop-down list. Click to select an option.
This option allows the user to: Yes. Select the Yes option for the default which prints all morphology components within differential tests, even if a component does not have any results. No. Select the No option to print only morphology components with results within differential tests. |
|
Primary Care Doctor Should Be Included with Copy-To Providers |
The primary care doctor of a patient shall be on the list of Copy-To providers who receive clinical reports.
Click to display the drop-down list. Click to select an option. The options are: Yes. Select the Yes option to include the primary care doctor. No. Select the No option to NOT include the primary care doctor. |
|
Keep Microbiology Organisms and Their Sensitivities Together |
To require that the Microbiology organisms and their sensitivities are kept together on the same page.
Click to display the drop-down list. Click to select an option. The options are: Yes. Select the Yes option to keep the Microbiology organisms and their sensitivities to certain antibiotics together on the same page of the report. No. Select the No option to NOT require that the Microbiology organisms and their sensitivities to certain antibiotics together on the same page of the report. |
|
Print Ignored Call Comments |
Refers to the Ignore button to display on the Call Comments dialog box. When you click the Ignore button, the call is not made, the system clears any comment that you may have entered, and the dialog box is closed.
Important: Ignored actions can be logged internally, and they can print on a clinical report. These actions include any comment (free text or predefined) made before you clicked the Ignore button or that you clicked the Ignore button without a comment.
Click to display the drop-down list. Click to select an option. The options are: Yes. Select the Yes option to require the Ignored call comments to print on the report. The comment that appears in the patient report is: "Critical/Changed value ignored." No. Select the No option to NOT print Ignored call comments print on the report. |
|
Bold Print Abnormal Results and Their Flags |
Indicate if you want abnormal test results and their flags to appear in boldface type in the report.
Click to display the drop-down list. Click to select an option. The options are: Yes. Select the Yes option to print the abnormal results and flags in bold. No. Select the No option to NOT print the abnormal results and flags in bold. |
|
Sample Types That Require Test Translations, Use ^ for Routine Type |
If the name of a test and sample types for the test must be translated to another language, use the ^ symbol for a routine sample type.
Sample types refer to the status of a sample. The sample types can include Routine and STAT, which are provided by Aspyra. All other codes are defined by each facility.
Enter the desired symbol for the routine sample type in the text box at the right. Enter a maximum of six characters. |
|
Print Send Out Site CLIA Number in PERFORMED AT Footnote |
When a specimen is sent to a send out (reference) lab to perform the ordered test, print the CLIA number of the site in the PERFORMED AT footnote on the report.
CLIA numbers are entered in the Send Out Code Maintenance submodule.
Click to display the drop-down list. Click to select an option. The options are: Yes. Select the Yes option to print the site CLIA number in the footnote. No. Select the No option to NOT print the site CLIA number in the footnote. |
|
Keep Test, Result and Its Text/Interpretations Together |
Indicate if you want the test, result, and text and/or result interpretation to print on the same page rather than to allow a page break before the interpretation.
Click to display the drop-down list. Click to select an option. The options are: Yes. Select the Yes option to require that the test, result, and text and/or interpretation be positioned together on the same page of the report. No. Select the No option to NOT keep the test, result, and text and/or interpretation together on the report. |
|
Print Result Response Changes with Changed Results |
Indicate that Result Response changes be printed on the report with other changed results.
Click to display the drop-down list. Click to select an option. The options are: Yes. Select the Yes option to require Result Response (RRG) changes to print on the report. No. Select the No option to NOT print Result Response changes on the report. |
|
Print Discharge Date and Time After Current Test Results
|
Indicate if you want the discharge date and time to be printed after the current test results.
Click to display the drop-down list. Click to select an option. The options are: Always Print - Select this option to always print the discharge date and time after the current test results. Only When Discharged Patient - Select this option to print the discharge date and time ONLY when a patient is discharged. |
|
Print Changed Results After Current Test Results |
Require changed test results to be printed at the end of the report after all current test results.
Click to display the drop-down list. Click to select an option. The options are: Yes. Select the Yes option to require that changed test result print after the current test results. No. Select the No option to NOT print changed test results after all current test results. |
|
Print Called Results After Current Test Results |
Require called test results to be printed at the end of the report after all current test results.
Click to display the drop-down list. Click to select an option. The options are: Yes. Select the Yes option to require that called test result print at the end of the report after all current test results. No. Select the No option to NOT print called test results after all current test results. |
|
Indent Test Names Based on Test Type (Excludes Console Tests) |
Refers to component test types of "No Worksheet" within a panel. Console tests, such as differentials, urinalysis, and Microbiology cultures, are excluded.
Click to display the drop-down list. Click to select an option. The options are: Yes. Select the Yes option to indent test names in the report based on test type. No. Select the No option to NOT indent test names in the report based on test type. All test types then line up the same. |
|
Start Column for Test Abbreviation on Result Line |
Enter the column number to position the abbreviation of the test name on the result line in the report.
Enter a maximum of two digits. If the text box is left blank, the test abbreviation does not print. |
|
Start Column for Test Abbreviation on Changed Result Line |
Enter the column number to position the abbreviation of the test name on the changed result line in the report.
Enter a maximum of two digits. If the text box is left blank, the test abbreviation does not print. |
|
Start Column for Test Abbreviation on Called Result Line |
Enter the column number to position the abbreviation of the test name on the called result line in the report.
Enter a maximum of two digits. If the text box is left blank, the test abbreviation does not print. |
|
Label for Resulted Date and Time
|
Enter in the text box the label for Resulted Date and Time that you want to appear on the report.
Enter a maximum of 20 characters in the first text box. Leave the text box blank, if you do not have a preference.
Enter a maximum of two digits to indicate the number of the column to position the label.
If resulted, the date/time does print. |
|
Start Columns for Resulted Date and Resulted Time |
Enter the column number to position the Resulted Date and the Resulted Time.
Note: Leave the text boxes blank if the resulted date and time are not to be printed in the report.
Resulted Date - Enter the column number in the first text box to the right of the label. Enter a maximum of two digits. Resulted Time - Enter the column number in the Resulted Time text box. Enter a maximum of two digits. |
|
Print Resulted Date and Time on Next Line After Result |
Indicate if you want the resulted date and time to be printed on the next line after the test result.
Click to display the drop-down list. Click to select an option. The options are: Yes. Select the Yes option to require that the resulted date and time be printed on the next line after the result in the report. No. Select the No option to require that the resulted date and time be printed on the same line as the result in the report. |
|
Start Column for Custom Questions and Comments |
Enter the column number to position the custom questions and comments in the report.
If the custom questions and comments are to be printed, enter a maximum of two digits. |
|
Print Custom Questions/Responses/Comments Option
|
Indicate if you want the custom questions and responses and/or comments to appear on the report.
Click to display the drop-down list. Click to select an option. The options are: Print All - Select this option to print the custom questions, the responses, and the comments in the report. Questions and Responses - Select this option to print only the questions and responses in the report. Responses and Comments- Select this option to print only the responses and comments in the report. Responses Only - Select this option to print only the responses to the custom questions in the report. Comments Only - Select this option to print only the comments in the report.
Note: Questions and comments defined as internal do not print. |
|
Print Blank Line After Direct Smear Result Text |
Print a blank line in the Interim report after the Microbiology direct smear result text appears.
Click to display the drop-down list. Click to select an option. The options are: Yes. Select the Yes option to print a blank line after the direct smear result test on the report. No. Select the No option to NOT print blank line after the direct smear result test on the report. |
|
Print Reported Date in Subheader |
Refers to the date that the test results of a Sample ID are first reported.
Click to display the drop-down list. Click to select an option. The options are: Yes. Select the Yes option to print the reported date in the subheader. No. Select the No option to NOT print the reported date in the subheader. |
|
Print Reported Time in Subheader
|
Refers to the time that the test results of a Sample ID are first reported.
Click to display the drop-down list. Click to select an option. The options are: Yes. Select the Yes option to print the reported time in the subheader. No. Select the No option to NOT print the reported time in the subheader. |
|
Print Changed Result Verify Flag
|
Note: This option is available only if you selected the Verify flag on the test result in the Results Entry submodule.
Indicate that you want the changed result verify flag to display on the report.
Click to display the drop-down list. Click to select an option. The options are: Yes. Select the Yes option to display the changed result verify flag, noting that the result is verified. No. Select the No option to NOT print verify flag with changed result, even if selected in Results Entry. |
For the Alpha Result Conversion table and Antibiotic Subheaders, see Alpha Result Conversion and Antibiotic Subheaders.